MVVM+Coordinators IOS Architecture Tutorial
Create a simple MVVM-C iOS architecture with Swift for starters
Intro
In this article, I want to share about the architecture I’ve been using for my projects and work. This article will also serve as my own documentation for myself so I know how far I learn about this architecture.
I will start by explaining what is MVVM and Coordinators, and some snippets on how to implement it.
Sorry for my bad english grammar because this is my very first article 😅😅. If there is something that I can improve on or there is any correction, feel free to correct me! Being a developer is a long life learning right? 😁
MVVM
Model-View-ViewModel or MVVM architecture has been really popular in IOS Development. Its been used in the industry for some time now. With the emerging of Swift UI (Declarative UI), this architecture will become a must have for IOS Developer in this industry.
MVVM did a great job for dividing business and UI logic. It tackles Huge View Controllers problem. If you have experience on using MVC. But, you can shrink the ViewControllers even more by separating Navigation codes to other file. The navigation codes I referring to is :
navigationController?.pushViewController(vc, animated: true)
navigationController?.presentViewController(vc, animated: true)
But why? it only consist of 1–2 line of code, of course it wont matter, right?
It may not contribute on dividing ViewControllers. BUT it violates the SOLID principles especially Single Responsibility. If you want to know about SOLID, there’s a good article with illustration here. If you know these principles, its really a plus and it will save many of your comrades when you code 😆😆.
So, where do we put the Navigation related codes? Yep, Coordinators.
Coordinators
As far as I’m using coordinators, I would see coordinators as travel guides. They are the ones who knows where to go, and what you need. If you want to take a bath, they know that you have to go to a place called Bathroom and they provide Towel, Soap, or Shampoo for you.
In my case, Coordinators job are to create all dependencies needed. For Example, it creates the ViewController and the ViewModel. The Coordinator passes the ViewModel into the ViewController. Coordinators also responsible for instantiate an API service, or any other service and inject it inside the ViewModel or ViewController as needed.
Short illustration : You (ViewController) are going to school, your mom (Coordinator) wakes you up (init ViewController), prepares your lunch (dependencies/services) and put your homework (dependencies/services) inside your backpack (viewModel). She puts the backpack (viewModel) on your back . And send you off to school.
In Swift, like this :
func goToLogin() {
    let vc = LoginViewController.instantiate(from: authStoryboard)
    let vm = LoginViewModel()
    vm.apiClient = authApi
    vm.authCoordinator = self
    vc.viewModel = vm
    navigationController.setViewControllers([vc], animated: true)
}
So I have explained the concept of using coordinators. But how to create one and implement it to the project?
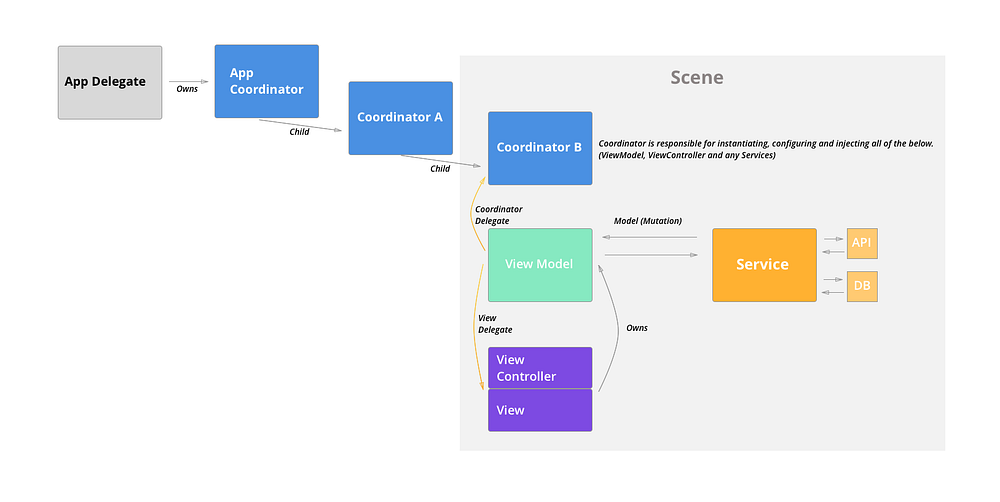
Implementation
Step 1 : Build the Coordinator Foundation
After creating an ios app xcode project, Lets create an App Coordinator. It will be a vital building block for your app later on.
protocol Coordinator {    var parentCoordinator: Coordinator? { get set }
    var children: [Coordinator] { get set }
    var navigationController : UINavigationController { get set }

    func start()
}
Its okay to use class or protocol as you like. It will act as a base template for every coordinator in your app.
Then lets create the AppCoordinator.
class AppCoordinator: Coordinator {
    var parentCoordinator: Coordinator?
    var children: [Coordinator] = []
    var navigationController: UINavigationController    init(navCon : UINavigationController) {
        self.navigationController = navCon
    }    func start() {
        print("App Coordinator Start")
    }}
Whats in the start()? start will contain the first operation or flow in your app. We will get back to it later.
Step 2 : Removing the SceneDelegate and Setup AppDelegate.
Go To AppDelegate and create your own Window. Why? AppCoordinator is needed as a global coordinator parent for your app thus we need to start the app with the AppCoordinator altogether. To do that, we have to “custom” the initialization of the app itself by holding our own window. As for IOS 13, there’s scene delegate that has our window variable.
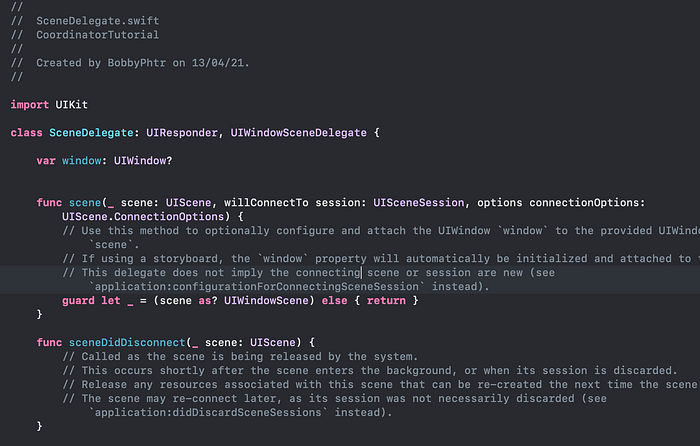
Lets delete the SceneDelegate and create window variable for our own. Also don’t forget to remove ApplicationSceneManifest in info.plist . I’ve also set my iOS Development Target to 12.0 so it can support earlier IOS.
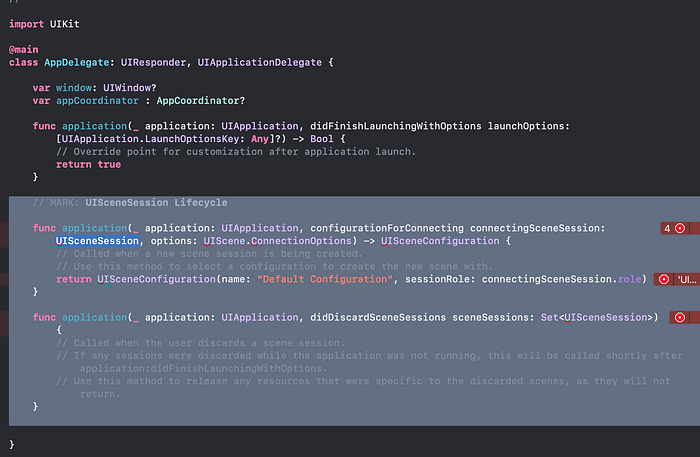
Then inside didFinishLaunchingWithOptions lets create our window and AppCoordinator!
class AppDelegate: UIResponder, UIApplicationDelegate {
    var window: UIWindow?
    var appCoordinator : AppCoordinator?     func application(_ application: UIApplication, didFinishLaunchingWithOptions launchOptions: [UIApplication.LaunchOptionsKey: Any]?) -> Bool {
        // Override point for customization after application launch.
         window = UIWindow(frame: UIScreen.main.bounds)         let navigationCon = UINavigationController.init()
         appCoordinator = AppCoordinator(navigationController: navigationCon)
         appCoordinator!.start()         window!.rootViewController = navigationCon
         window!.makeKeyAndVisible()
         return true
     }
}
and when you run it, it will produce this.

An empty UINavigationController and you should see Start The App! being printed on the console. Which means, your App now starts with AppCoordinator!
Step 3 : Tools for the Coordinator
Well as you see. Its empty. You still have your Main.storyboard with initialViewControllers being set. But why doesn’t it work? Because we give window a value. Read here you want to know how AppDelegate works.
About Storyboards
If you use coordinators and storyboards, segues and initial view controllers are not used anymore because the coordinators are the one who responsible to navigate and transporting data between VCs. In my view, when I use coordinators, I see storyboards as containers of many VCs. It only helps to group ViewControllers, and AutoLayout. No connection or segues used in this architecture because that role belongs to Coordinators.
I really recommend on working with many storyboards for larger projects. It helps you groups view controllers and make our project structures tidier! If you want me to share about this, feel free to comment! 😁😁
For now, as long as you have Main Interface (General->Deployment Info) set on your Main.storyboards it still works fine.
Let’s add some functions to our AppCoordinator .
class AppCoordinator : Coordinator {    var parentCoordinator: Coordinator?
    var children: [Coordinator] = []
    var navigationController: UINavigationController    init(navigationController : UINavigationController) {
        self.navigationController = navigationController
    }    func start() {
         // The first time this coordinator started, is to launch login page.
    goToLoginPage()
    }

    let storyboard = UIStoryboard.init(name: "Main", bundle: .main)    func goToLoginPage(){         // Instantiate LoginViewController
         let loginViewController = storyboard.instantiateViewController(withIdentifier: "LoginViewController") as! LoginViewController         // Instantiate LoginViewModel
         let loginViewModel = LoginViewModel.init()         // Set the Coordinator to the ViewModel
         loginViewModel.appCoordinator = self         // Set the ViewModel to ViewController
         loginViewController.viewModel = loginViewModel         // Push it.
        navigationController.pushViewController(loginViewController, animated: true)    }    func goToRegisterPage(){
        let registerViewController = storyboard.instantiateViewController(withIdentifier: "RegisterViewController") as! RegisterViewController
        let registerViewModel = RegisterViewModel.init()
        registerViewModel.appCoordinator = self
        registerViewController.viewModel = registerViewModel
         navigationController.pushViewController(registerViewController, animated: true)
    }}
As you see, the purpose of these functions solely for injecting and navigating using the UINavigationController. It includes ApiServices, or even ViewModels that scope more than 2 ViewControllers. To pass the data, you can just add parameters into the function and inject it to next VC or VM.
Step 4: Showing UIViewControllers with ViewModel
I’ve created 2 very simple ViewControllers and connect it to our storyboards as IBOutlet.
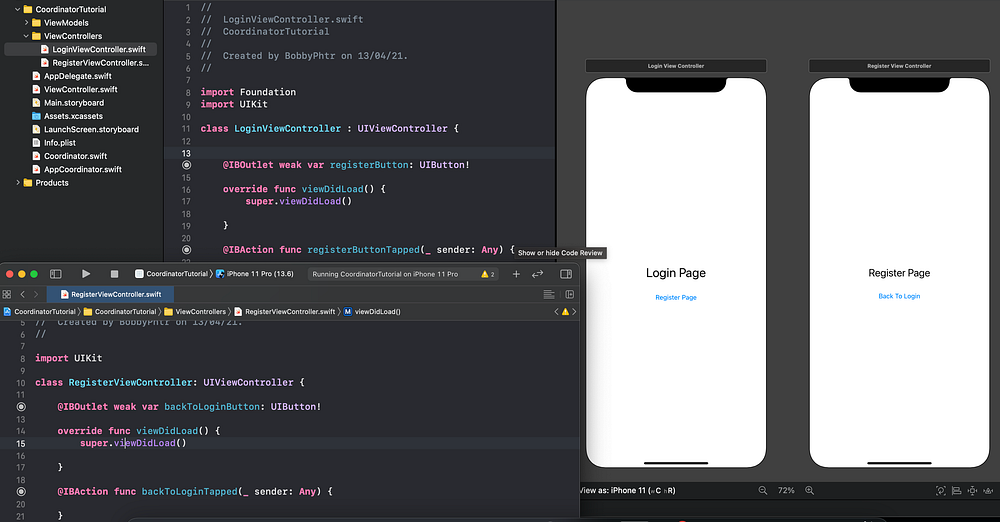
Let’s create the ViewModel for each of our ViewControllers. The LoginViewModel here only contains a function to ask the coordinator to go to the register page. Its the same as RegisterViewModel.
import Foundation
class LoginViewModel {
    weak var coordinator : AppCoordinator!

    func goToRegister(){
        coordinator.goToRegisterPage()
    }
}class RegisterViewModel {
    weak var appCoordinator : AppCoordinator!
    func goToLogin(){
        appCoordinator.goToLoginPage()
    }
}
Here’s both ViewControllers.
class LoginViewController : UIViewController {
    var viewModel : LoginViewModel!
    @IBOutlet weak var registerButton: UIButton!    override func viewDidLoad() {
        super.viewDidLoad()
    }    @IBAction func registerButtonTapped(_ sender: Any) {
        viewModel.goToRegister()
     }
}class RegisterViewController: UIViewController {
    var viewModel : RegisterViewModel!
    @IBOutlet weak var backToLoginButton: UIButton!

    override func viewDidLoad() {
        super.viewDidLoad()
    }    @IBAction func backToLoginTapped(_ sender: Any) {
        viewModel.goToLogin()
    }
}
As you can see, now the viewControllers can focus on view related operations. Because the navigation processes are moved to the coordinator.
The Result
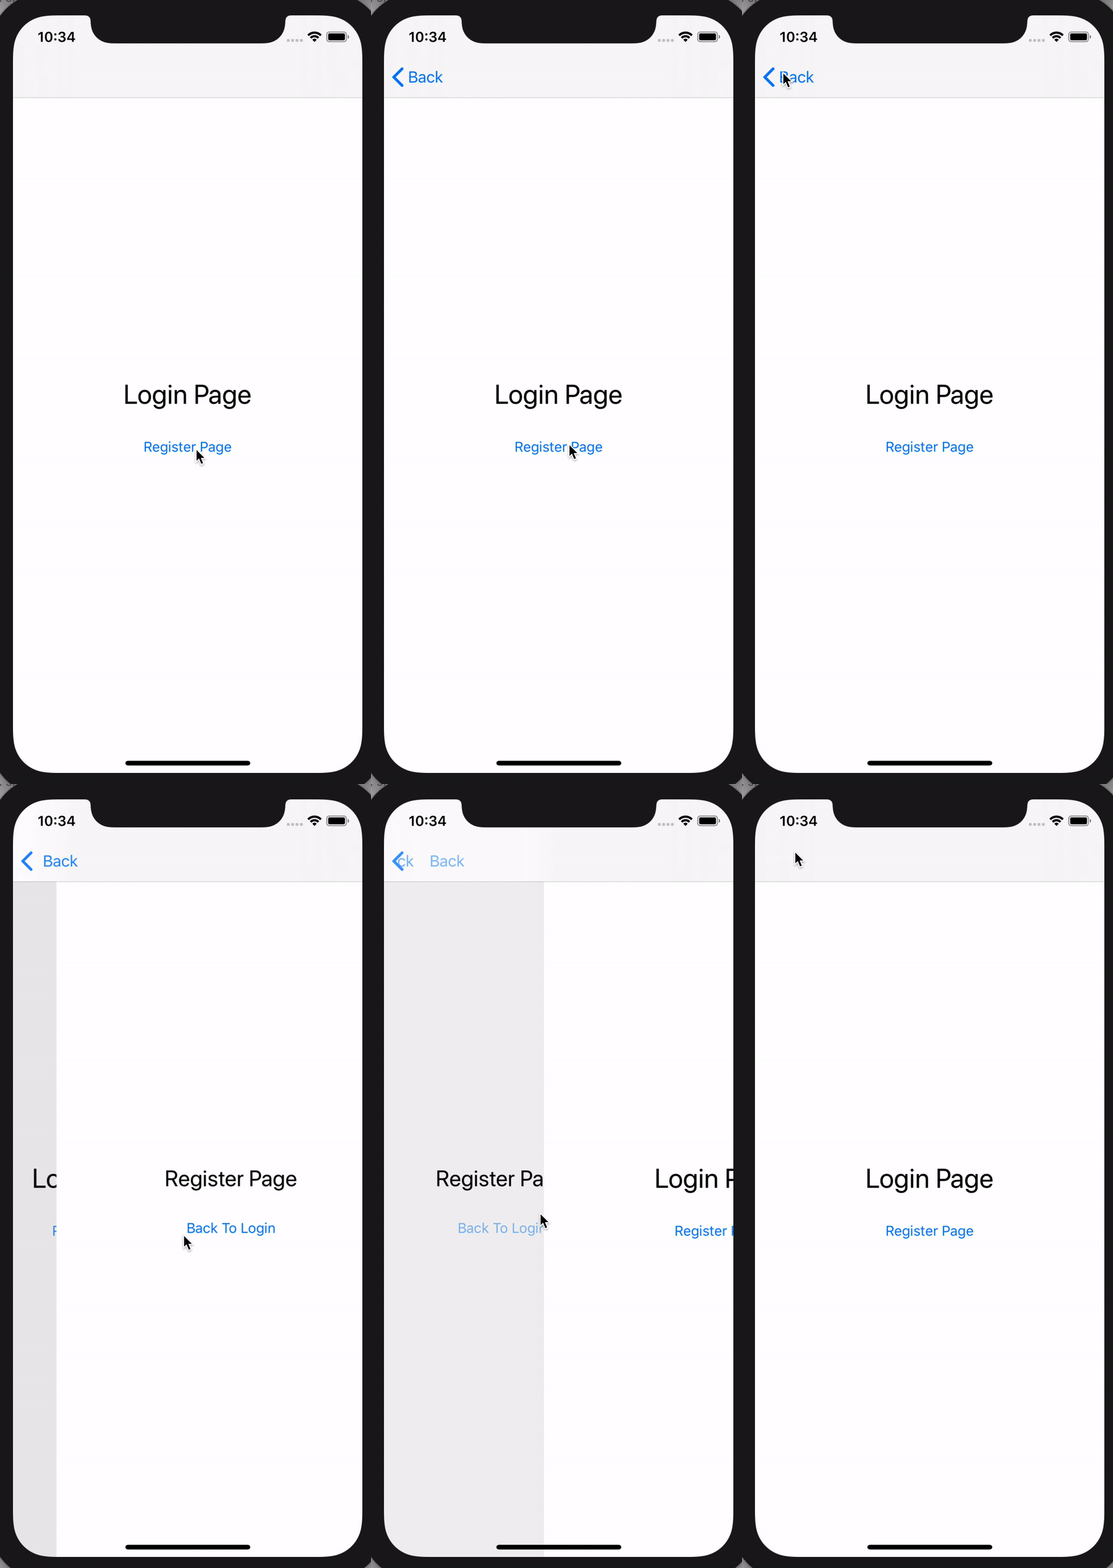
And now, a scaling ready app is in your disposal!
Other Topics
SO…. if the all the navigation code being moved to the AppCoordinator, would the AppCoordinator become HugeAppCoordinator? Well it depends on how you use it. But No.
Coordinators can have many child coordinator.
Child Coordinator helps to group navigation codes. For example, if you have authentication related pages that you want to bundle, you can create AuthCoordinator that handles Login, Register, PIN or OTP and change PIN. For HomeCoordinator may contain a home page, profile page or history page. It is depending on the requirement of your projects and your style of managing things.
I will talk about Child Coordinators in another topics. But if you can’t wait, you can checkout references I list below!
Back Button and Memory Management also interesting topics. But it is a tale to talk about in another time.
Recommended Reference
- SOLID Principles with Illustrations : https://medium.com/backticks-tildes/the-s-o-l-i-d-principles-in-pictures-b34ce2f1e898
- MVVM + C Tutorial : https://medium.com/sudo-by-icalia-labs/ios-architecture-mvvm-c-introduction-1-6-815204248518
I hope this article helps you in anyway, Sorry for poor english grammar. If there is any correction or something lack, I will glad to look into it!
Wish you all good health and a good food! 🍫🍲
Improvements and Updates
Hey, its been a long time… I’m a bit busy and gone trough some rough months. But anyway, I managed to put the project on Github! Here’s the link to check it out!. There’s already some change, but the concept are still the same!
So I read a very helpful response by Russ Warwick to put all the dumb functions inside a protocol (interface) and implement it to the Coordinator rather passing the coordinator instance inside the ViewModel.
So I’m adding the LoginNavigation protocol. With this, the ViewModel know nothing about the Coordinator. This is a cleaner way to code so the Coordinator can be easily modified.
Feel free to correct my code, every inputs can lead to a better code for the future!

